
Free Amigurumi Crochet Dog Bone Pattern

Are you looking for an adorable and easy-to-follow crochet pattern that will have your furry friends wagging their tails in excitement? Then you must try this free Amigurumi crochet dog bone pattern! I have also included some helpful video tutorials to help you along the way.
This quick and no-sew dog bone Amigurumi pattern is the prefect thing for all you dog lovers out there. It will help you make the perfect toy for your beloved pets and will keep them entertained for hours. And you can easily customise it with a squeaker or a rattle to make it even more entertaining. Isn’t that paw-some?! 🙂
I made this crochet bone for my friend’s dog and she absolutely loved it! 🙂

Scroll down to view the whole pattern for both the bigger and little dog bone
Join our Dreamee Crochet Facebook group to share your makes, chat to fellow crocheters or to exchange tips and tricks. You can also share feedback and ask for support when working with my patterns.
Free Amigurumi Crochet Dog Bone Pattern: Notes
Skill level: intermediate crochet skills and knowledge
Finished size when using a 2.5mm = B/1 hook and Fine Sport #2 = 4 ply:
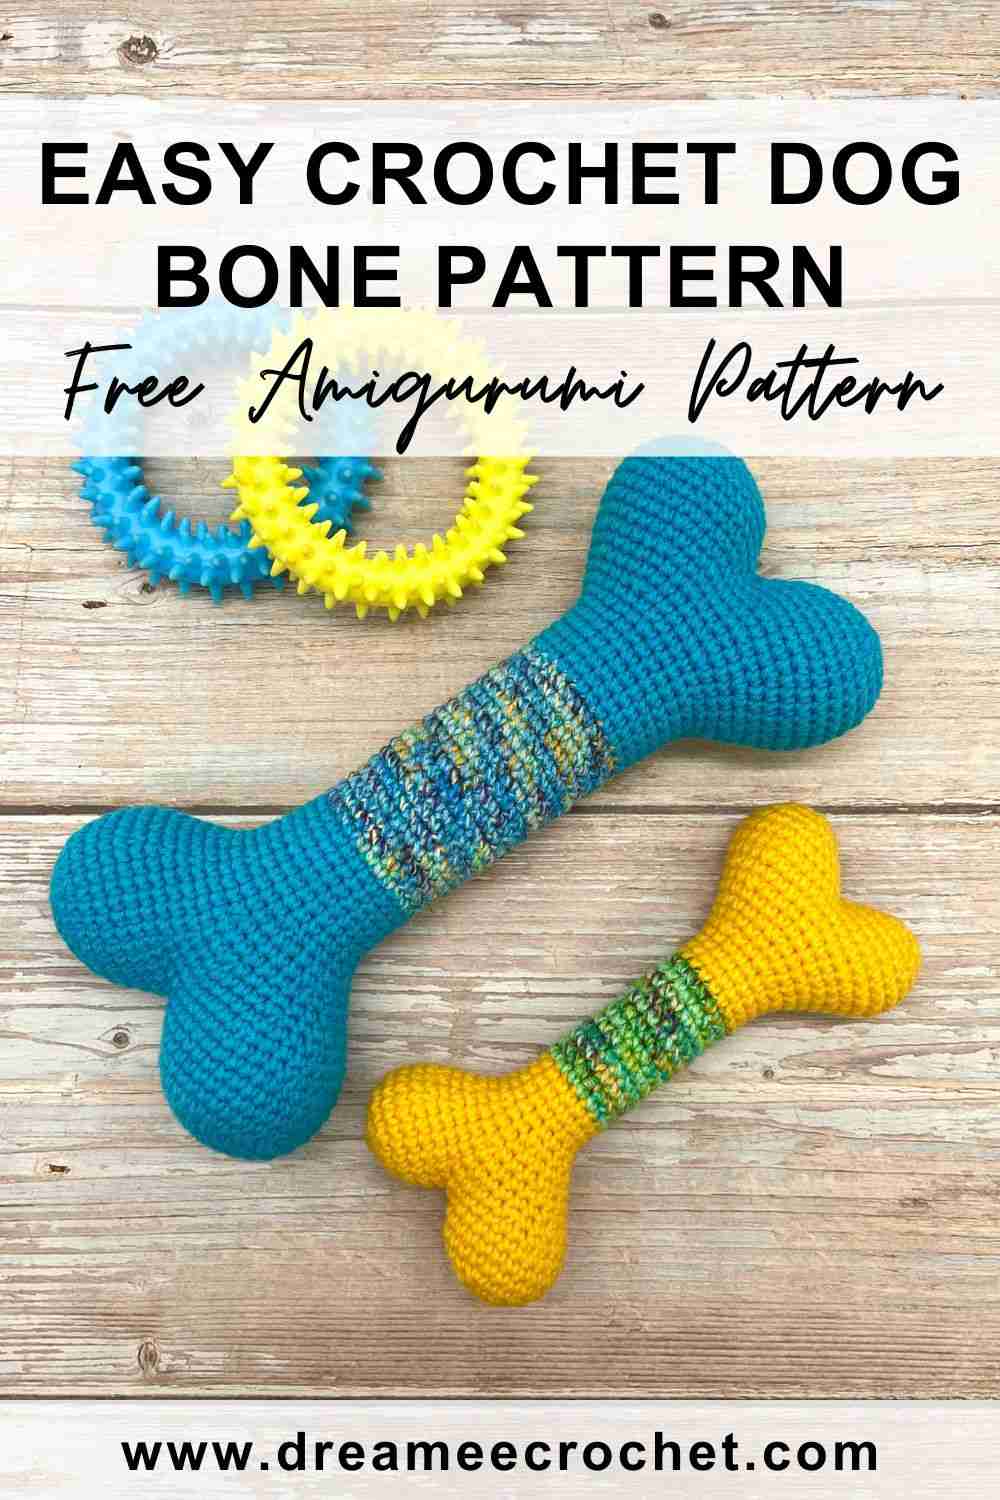
– Bigger bone: length – 21cm (8″), width – 9cm (3.5″)
– Smaller bone: length – 14cm (5.5″), width – 6cm (2.5″)
Terminology: US crochet terminology
Gauge (2″ x 2″): 14 rounds x 12 stitches
Notes: this pattern is worked in continous rounds, which means you will not slip stitch at the end of each round. Instead you will continue to crochet the next round in the next stitch.
Free Amigurumi Crochet Dog Bone Pattern: Materials & Tools
Yarn: this pattern will work nicely with 100% cotton, 100% acrylic or a blend of both. I recommend using Fine Sport #2 = 4 ply OR Light Worsted #3 = DK. You can also use different yarn such as Worsted Weight Yarn #4 but the size of the bones will be a bit larger.
I used the below vibrant colors but the crochet bone will also look nice in natural color:
– Fine Sport #2 = 4 ply
– 55% cotton and 45% acrylic blend
Color A:
– 1x ball of YarnArt Jeans – blue 55 – (50g/160m)
– 1x ball of YarnArt Jeans – yellow 35 – (50g/160m)
Color B used for the middle part:
– 1x ball of YarnArt Jeans Tropical – multicolored 614 – (50g/160m)
– 1x ball of YarnArt Jeans Tropical – multicolored 616 – (50g/160m)
Crochet hook:
I used 2.5 mm hook = B/1 because I wanted the stitches to be very dense so the stuffing wouldn’t come out. Refer to the instructions on your yarn label if using different weight of yarn but go one size smaller.
Tools used:
Scissors, tapestry needle, stitch marker, polyester stuffing, plastic squeaker – 33mm /1.3″ diameter (optional)

Free Amigurumi Crochet Dog Bone Pattern: Abbreviations
This free pattern is written using basic crochet stitches in US terms. Download this free printable chart with UK terms.
MR: magic ring/magic circle
ST: stitch
CH: chain
SL ST / SS: slip stitch
SC: single crochet stitch
INC: increase = two single crochet stitches in the same stitch
INV DEC: invisible decrease = insert the hook into the front loop of the first stitch (two loops on hook) and immediately insert it again into the front loop of the next stitch (three loops on the hook). Yarn over and draw through the first two loops on the hook (two loops on the hook). Yarn over and draw through the two loops on the hook to finish your invisible decrease.
FO: fasten off
(…..) x 6: repeat the pattern inside the brackets by the given number (in this example, repeat the pattern in the brackets 6 times)
{…}: number shown inside these brackets equals the number of total stitches at the end of each round/row
Join Our
COMMUNITY
Join my Dreamee Crochet Facebook group to ask for support, share your creations and exchange tips with fellow crochet makers.
Free Amigurumi Crochet Dog Bone Pattern: Large Size Bone
Notes
– Crochet the bone in a continous round, do not slip stitch at the end of each round. Instead continue to crochet the next round in the next stitch.
– Use tight tension rather than a regular tension so you don’t have large gaps in between your stitches and the stuffing is not showing
– No special stitches needed…you will just be using the single crochet stitch (SC), single crochet increase (INC) and invisible single crochet decrease (INV DEC).
– Crochet 2 separate cups that will form one end of the bone first; join these two cups together and continue to crochet the middle of the bone, then split the round into 2 separate rounds/cups to form the other end of the bone.
– I recommend using a longer piece of string as a running stitch marker so you can easily go back and count the number of rounds. Either way, a stitch marker is a must when working in a continous round.
You can also download the ad-free and printable pdf version of this pattern for a small fee by clicking on the ‘Download’ button below. Your generous contribution will help towards the cost of materials and running this website so I can continue to publish my free patterns online for everyone to enjoy.

Written Pattern
Crochet two separate cups using the bellow pattern – R1 to R9:
R1: MR – 6 x SC into the ring {6} – watch this step by step video tutorial on How to crochet a magic ring
If you have a struggle with the magic ring, then you can do this instead of using MR: CH4, SS into 1st CH to create a circle and 6x SC into the circle
R2: INC in each ST around {12}
R3: (SC in next ST, INC in next ST) x 6 {18}
R4: SC in next ST, INC in next ST, (SC in next 2 STs, INC in next ST) x 5, SC in next ST {24}
R5: (SC in next 3 STs, INC in next ST) x 6 {30}
R6: SC in next 2 STs, INC in next ST, (SC in next 4 STs, INC in next ST) x 5, SC in next 2 STs {36}
R7 – R9 (3 rounds): SC in each ST around {36}
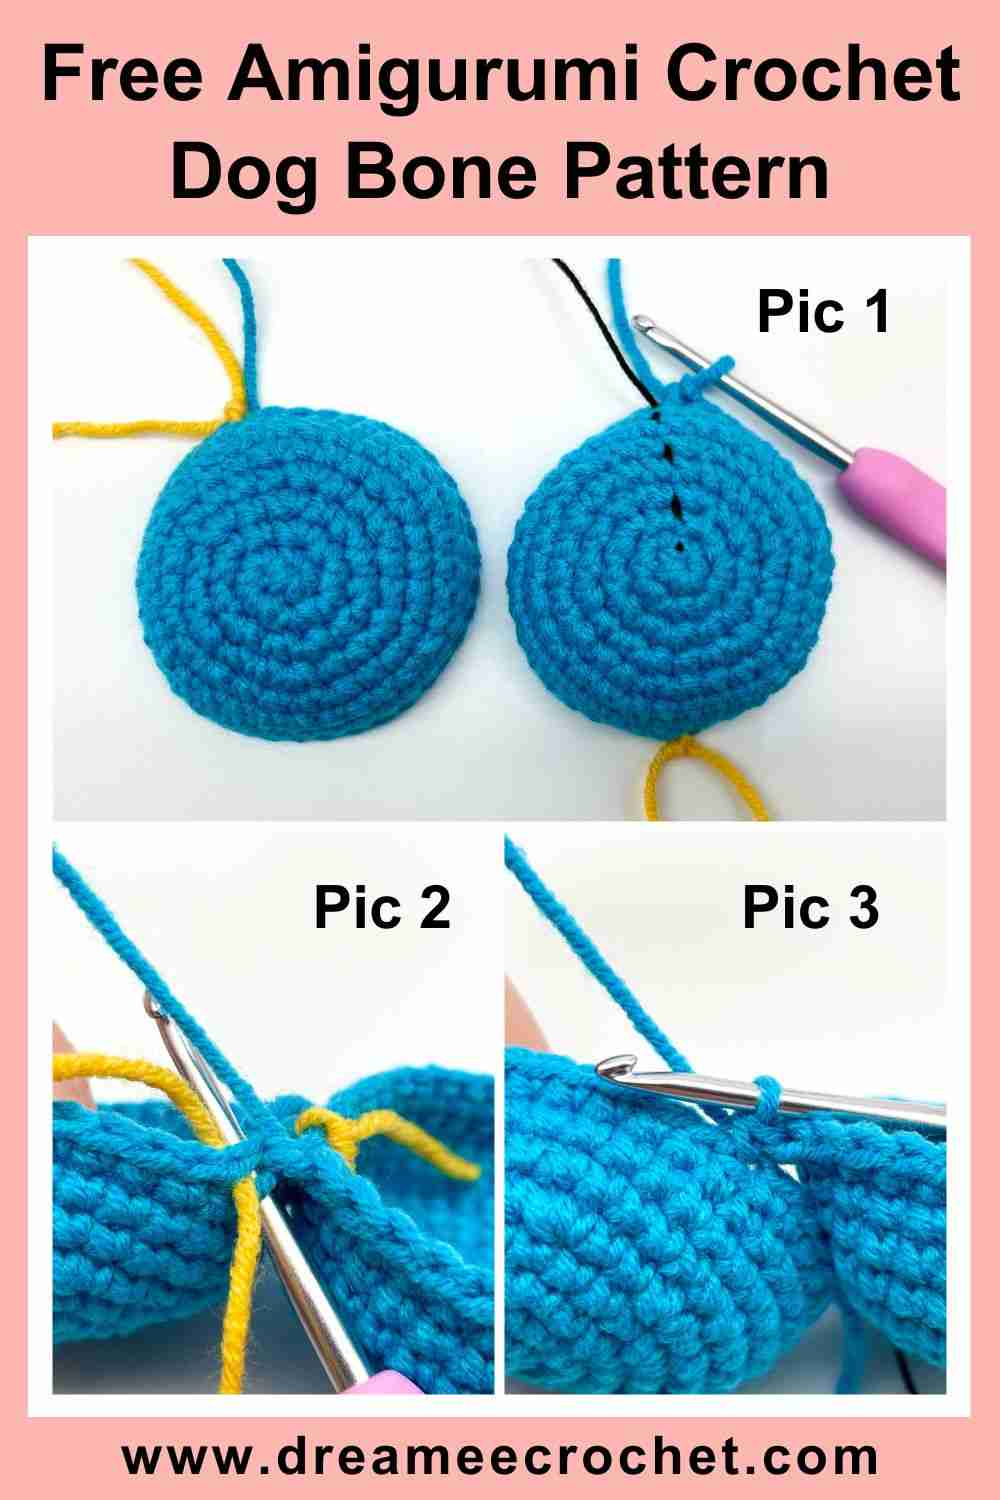
First cup – FO after R9 and cut the yarn leaving a longer tail for sewing; insert a stitch marker into the first stitch of R9 (Pic 1)
Second cup – don’t FO and don’t cut the yarn off; insert a stitch marker into ST19 of R9 (Pic 1); leave your hook in and join the two cups together as per the instructions in the next section of the pattern
Joining the Two Cups Together
R10 – continue from where you finished with R9 in the second cup:
– SC in next 18 STs in the second cup
– insert your hook into the first cup – into the stitch with the stitch marker in it – and SC (Pic 2 & 3)
– SC in next 35 STs in the first cup
– insert your hook back into the second cup – into the stitch with the stitch marker in it – and SC (Pic 4 & 5)
– SC in next 17 STs (Pic 6) {72}

– you have now joined the two cups together and will continue to crochet the bone in a continuous round – don’t worry about the little gap in between the cups, you will close it at a later stage
R11: SC in next 5 STs, INV DEC, (SC in next 10 STs, INV DEC) x 5, SC in next 5 STs {66} – watch this step by step video tutorial on How to crochet an invisible decrease
R12: (SC in next 9 STs, INV DEC) x 6 {60}
R13: SC in next 4 STs, INV DEC, (SC in next 8 STs, INV DEC) x 5, SC in next 4 STs {54} (Pic 7)
You can now close the gap in between the two cups: thread a yarn needle with the yarn tail you have left after you completed the first cup and close the gap with a few stitches on the wrong side (on the inside); weave the yarn tail in
R14: (SC in next 7 STs, INV DEC) x 6 {48}
R15: SC in next 3 STs, INV DEC, (SC in next 6 STs, INV DEC) x 5, SC in next 3 STs {42}
R16: SC in each ST around {42}
R17: (SC in next 5 STs, INV DEC) x 6 {36}
R18: SC in each ST around {36}
R19: SC in next 2 STs, INV DEC, (SC in next 4 STs, INV DEC) x 5, SC in next 2 STs {30} – start stuffing and stuff gradually as you go along (Pic 8)

R20 – R25 (6 rounds): SC in each ST around {30}
You can now insert the squeaker into the bone and stuff around it
Change yarn to multicoloured yarn
R26 – R44 (19 rounds): SC in each ST around {30}
Change yarn back to blue yarn
R45 – R50 (6 rounds): SC in each ST around {30}
R51: SC in next 2 STs, INC in next ST, (SC in next 4 STs, INC in next ST) x 5, SC in next 2 STs {36}
R52: SC in each ST around {36}
R53: (SC in next 5 STs, INC in next ST) x 6 {42}
R54: SC in each ST around {42}
R55: SC in next 3 STs, INC in next ST, (SC in next 6 STs, INC in next ST) x 5, SC in next 3 STs {48}
R56: (SC in next 7 STs, INC in next ST) x 6 {54}
R57: SC in next 4 STs, INC in next ST, (SC in next 8 STs, INC in next ST) x 5, SC in next 4 STs {60}
R58: (SC in next 9 STs, INC in next ST) x 6 {66}
R59: SC in next 5 STs, INC in next ST, (SC in next 10 STs, INC in next ST) x 5, SC in next 5 STs {72}
R60: SC in each ST around {72}
Splitting the Bone to Create Two Separate Cups at the Other End
You will now split R60 into 2 rounds so you can crochet the other end of the bone
– each round will have 36 stitches
– you will first finish crocheting one round from where you finished with R60 until F-R68 – first cup
– and then will go back to R60 and will crochet the second round until S-R68 – second cup
Before you get started, insert 3 stitch markers of different colours into R60 (Pic 9):
– insert one stitch marker into ST28 of R60 – I will be using a pink stitch marker
– insert another stitch marker into ST63 of R60 – I will be using a green stitch marker
– insert another stitch marker into ST64 of R60 – I will be using a yellow stitch marker

First cup:
F-R61: continue to crochet in a continous round from where you finished with R60, SC in next 27 STs, insert your hook into the stitch with the yellow stitch marker in it and SC (Pic 10), SC in next 8 STs {36}
F-R62 – F-R63 (2 rounds): SC in each ST around {36} (Pic 11)
F-R64: SC in next 2 STs, INV DEC, (SC in next 4 STs, INV DEC) x 5, SC in next 2 STs {30}
F-R65: (SC in next 3 STs, INV DEC) x 6 {24}
F-R66: SC in next ST, INV DEC, (SC in next 2 STs, INV DEC) x 5, SC in next ST {18}
F-R67: (SC in next ST, INV DEC) x 6 {12}
F-R68: SC in each ST around {12}
Stuff well, close the hole using a yarn needle and weave the yarn end in (Pic 12)
Watch this step by step video tutorial on How to close a hole in an Amigurumi piece
You have now finished the first cup so you can start working on the second cup:
– you will need to attach a new strand of blue yarn to R60
– and then you will continue to crochet the second cup in a continous round just like you did the first cup
Second cup:
S-R61:
– create a slip knot on your hook using a new strand of blue yarn
– go back to R60, insert your hook into the stitch with the pink stitch marker in it and SC (Pic 13)
– the stitch you have just created will be the first ST of S-R61
– SC into next 35 STs {36} – your last ST should go into the ST with the green stitch marker in it (Pic 14)

S-R62: SC in the first ST of S-R61 and then SC in each ST around {36}
S-R63: SC in each ST around {36} (Pic 15)
You will notice that you have a little gap left in between the two cups again. You should have a yarn tail left from when you attached the new strand of yarn so pull this yarn tail out through the gap so you can use it to close the gap at a later stage.
S-R64: SC in next 2 STs, INV DEC, (SC in next 4 STs, INV DEC) x 5, SC in next 2 STs {30}
S-R65: (SC in next 3 STs, INV DEC) x 6 {24}
S-R66: SC in next ST, INV DEC, (SC in next 2 STs, INV DEC) x 5, SC in next ST {18}
S-R67: (SC in next ST, INV DEC) x 6 {12}
S-R68: SC in each ST around {12}
Stuff well, close the hole using a yarn needle and weave the yarn end in (Pic 16)
You can now close the gap in between the two cups: thread a yarn needle with the yarn tail you pulled through the gap and close the gap with a few stitches on the outside; weave the yarn tail in.
And that’s it, your bone is completed! 🙂
Free Amigurumi Crochet Dog Bone Pattern: Smaller Size Bone
Notes
You will crochet the smaller bone using the same steps and techniques as the bigger bone. But you will not insert a squeaker as the bone is too small for that.
Written Pattern
Crochet two separate cups using the bellow pattern – R1 to R6:
R1: MR – 6 x SC into the ring {6}
R2: INC in each ST around {12}
R3: (SC in next ST, INC in next ST) x 6 {18}
R4: SC in next ST, INC in next ST, (SC in next 2 STs, INC in next ST) x 5, SC in next ST {24}
R5 – R6 (2 rounds): SC in each ST around {24}
First cup – FO after R6 and cut the yarn leaving a longer tail for sewing; insert a stitch marker into the first stitch of R6
Second cup – don’t FO and don’t cut the yarn off; insert a stitch marker into ST13 of R6; leave your hook in and join the two cups together as per the instructions in the next section of the pattern
Joining the Two Cups Together
R7– continue from where you finished with R6 in the second cup:
– SC in next 12 STs in the second cup
– insert your hook into the first cup – into the stitch with the stitch marker in it – and SC
– SC in next 23 STs in the first cup
– insert your hook back into the second cup – into the stitch with the stitch marker in it – and SC
– SC in next 11 STs {48}
– you have now joined the two cups together and will continue to crochet the bone in a continuous round – don’t worry about the little gap in between the cups, you will close it at a later stage
R8: SC in next 3 STs, INV DEC, (SC in next 6 STs, INV DEC) x 5, SC in next 3 STs {42}
R9: (SC in next 5 STs, INV DEC) x 6 {36}
You can now close the gap in between the two cups: thread a yarn needle with the yarn tail you have left after you completed the first cup and close the gap with a few stitches on the inside; weave the yarn tail in
R10: SC in next 2 STs, INV DEC, (SC in next 4 STs, INV DEC) x 5, SC in next 2 STs {30}
R11: SC in each ST around {30}
R12: (SC in next 3 STs, INV DEC) x 6 {24}
R13: SC in each ST around {24}
R14: SC in next ST, INV DEC, (SC in next 2 STs, INV DEC) x 5, SC in next ST {18}
Start stuffing and stuff gradually as you go along
R15 – R18 (4 rounds): SC in each ST around {18}
Change yarn to multicoloured yarn
R19 – R30 (12 rounds): SC in each ST around {18}
Change yarn back to yellow yarn
R31 – R34 (4 rounds): SC in each ST around {18}
R35: SC in next ST, INC in next ST, (SC in next 2 STs, INC in next ST) x 5, SC in next ST {24}
R36: SC in each ST around {24}
R37: (SC in next 3 STs, INC in next ST) x 6 {30}
R38: SC in each ST around {30}
R39: SC in next 2 STs, INC in next ST, (SC in next 4 STs, INC in next ST) x 5, SC in next 2 STs {36}
R40: (SC in next 5 STs, INC in next ST) x 6 {42}
R41: SC in next 3 STs, INC in next ST, (SC in next 6 STs, INC in next ST) x 5, SC in next 3 STs {48}
R42: SC in each ST around {48}
Splitting the Bone to Create Two Separate Cups at the Other End
You will now split R42 into 2 rounds so you can crochet the other end of the bone:
– each round will have 24 stitches
– you will first finish crocheting one round from where you finished with R42 until F-R47 – first cup
– and then will go back to R42 and will crochet the second round until S-R47 – second cup
Before you get started, insert 3 stitch markers of different colours into R42:
– insert one stitch marker into ST22 of R42 – I will be using a pink stitch marker
– insert another stitch marker into ST45 of R42 – I will be using a green stitch marker
– insert another stitch marker into ST46 of R42 – I will be using a blue stitch marker
First cup:
F-R43: continue to crochet in a continous round from where you finished with R42, SC in next 21 STs, insert your hook into the stitch with the blue stitch marker in it and SC, SC in next 2 STs {24}
F-R44: SC in each ST around {24}
F-R45: SC in next ST, INV DEC, (SC in next 2 STs, INV DEC) x 5, SC in next ST {18}
F-R46: (SC in next ST, INV DEC) x 6 {12}
F-R47: SC in each ST around {12}
Stuff well, close the hole using a yarn needle and weave the yarn end in
You have now finished the first cup so you can start working on the second cup:
– you will need to attach a new strand of yellow yarn to R42
– and then you will continue to crochet the second cup in a continous round just like you did the first cup
Second cup:
S-R43:
– create a slip knot on your hook using a new strand of yellow yarn
– go back to R42, insert your hook into the stitch with the pink stitch marker in it and SC
– the stitch you have just created will be the first ST of S-R43
– SC into next 23 STs {24} – your last ST should go into the ST with the green stitch marker in it
S-R44: SC in each ST around {24}
You will notice that you have a little gap left in between the two cups again. You should have a yarn tail left from when you attached the new strand of yarn so pull this yarn tail out through the gap so you can use it to close the gap at a later stage.
S-R45: SC in next ST, INV DEC, (SC in next 2 STs, INV DEC) x 5, SC in next ST {18}
S-R46: (SC in next ST, INV DEC) x 6 {12}
S-R47: SC in each ST around {12}
Stuff well, close the hole using a yarn needle and weave the yarn end in
You can now close the gap in between the two cups: thread a yarn needle with the yarn tail you pulled through the gap and close the gap with a few stitches on the outside; weave the yarn tail in.
And that’s it, your bone is completed! 🙂
Share Your Crochet Project with Us
I hope you enjoyed crocheting this tug of war dog toy and found the free Amigurumi crochet dog toy pattern easy to follow! And I also hope your little pawed friends will love their new handmade gift. I welcome your feedback so please leave a comment in the comment box at the bottom of this page.
And as always, I love to see your finished projects so please share a photo with us on Instagram with the hashtag #dreameecrochet.
Join our Dreamee Crochet Facebook group to share your makes, chat to fellow crocheters, make new crochet friends or to exchange tips and tricks. You can also share feedback and ask for support when working with my patterns.
You Need to Check These Out!
If you like this pattern you may also enjoy these crochet toys and Amigurumi patterns. Or visit my free crochet patterns and video tutorials for more beautiful patterns and videos you will love!
Free Crochet Bunny Lovey Pattern
Free crochet heart pillow pattern
Free Crochet Bear Lovey Pattern
Happy crocheting! 🙂


Your tutorial says the hook is a B/1 but the size is listed as 2.5mm. From what I read a B/1 is typically 2mm and a C/2 is 2.5mm.
Hi Jeremy,
I used 2.5mm crochet hook for this pattern and since there is no equivalent for 2.5mm crochet hook I suggested using B/1 which is 2.25mm. You could also use C/2 which equals 2.75mm but it’s better to use a smaller hook when working on Amigurumi.
Hope this helps but please let me know if you have more questions.
Love, Petra x