
Single Crochet Ribbing Stitch: Easy Beginner Tutorial

When I started crocheting one of the first things I did was to learn how to make single crochet ribbing stitch. And that’s because it’s such a simple yet very handy stitch to learn! This crochet stitch creates a very satisfying stretchy ribbing texture on both sides of your work.
This stitch is one of the ‘must to know’ stitches as it’s very versitile. It can be used not only when working on hems for your hats, scarfs or mittens but to also create fun projects such as a Halloween pumpkin. 🙂

In this tutorial, you’ll learn the step-by-step process of single crocheting the ribbing stitch, how to change colors and even how to count the rows. I will also share with you a great tip on how to keep the edges tighter. So grab your hook and yarn and let’s get started!
Scroll down to view the written & video tutorial.
Join our Dreamee Crochet Facebook group to share your makes, chat to fellow crocheters or to exchange tips and tricks. You can also share feedback and ask for support when working with my free patterns.

Single Crochet Ribbing Stitch
This single crochet ribbing stitch is a double sided stitch which means the pattern is identical on both sides of your project. You can achieve a beautiful texture just by using a few basic crochet stitches.
Skill level: begginer crochet skills and knowledge
Terminology: US crochet terminology
Ideal stitch for: hats, scarfs, mittens, ear warmers, sweater cuffs, cup/mug cozies, pumpkins
My patterns using the single crochet ribbing stitch:
Free ribbed cup cozy crochet pattern
Free crochet fingerless gloves pattern
Free twist headband crochet pattern
Crochet Terminology
This tutorial is written using US crochet terminology. Download this free printable chart with UK terms). You can print it and keep forever so you always have it to hand.
FCH: foundation chain
R: row
ST: stitch
CH: chain stitch
SC: single crochet stitch
BLO: back loop of the stitch
TO: turn your work over
FO: fasten off
{…}: number shown inside these brackets equals the number of stitches at the end of row
Join Our
COMMUNITY
Join my Dreamee Crochet Facebook group to ask for support, share your creations and exchange tips with fellow crochet makers.
Written Tutorial
The single crochet ribbing stitch is a very simple stitch pattern to learn, basically you will just work single crochet stitches into the back loop of each stitch apart from the first and the last stitch in each row, where you will crochet into the whole loop.
FCH: Chain desired length plus one extra chain – the length of the rib will depend on the number of chains in your foundation chain
R1: SC in back bump of each chain across starting from second chain from the hook; CH1 (this will be your turning chain) and TO
R2:
– SC in the whole loop (front loop and back loop) of the 2nd chain from the hook (Pic 1)
– SC into BLO of the next ST
– SC into BLO = insert your crochet hook into the back loop only (Pic 2), yarn over and pull through the stitch – you will have two loops on the hook (Pic 3), yarn over and pull through remaining two loops on the hook (Pic 4)
– that’s your first SC into BLO completed, repeat for the remaining stitches across apart from the last ST
– SC in the whole loop of the last ST, watch out as the last stitch of the row can be easily overlooked
– CH1 and TO
Note: when working on a project using the single crochet ribbing stitch, the edges tend to stretch a bit more than the middle of your work. This is why you will work SC into the whole loop of the first and the last stitch in each row. This helps to keep the edges a bit tighter.

R3:
– SC in the whole loop of the 2nd chain from the hook
– SC into BLO of each ST across apart from the last ST
– SC in the whole loop of the last ST
– CH1 and TO
– repeat R3 until you have achieved the desired number of rows
Last row:
– repeat row R3 but do not CH1 at the end of the row
– you can now FO and weave the yarn ends in or follow the instructions in the pattern you are using
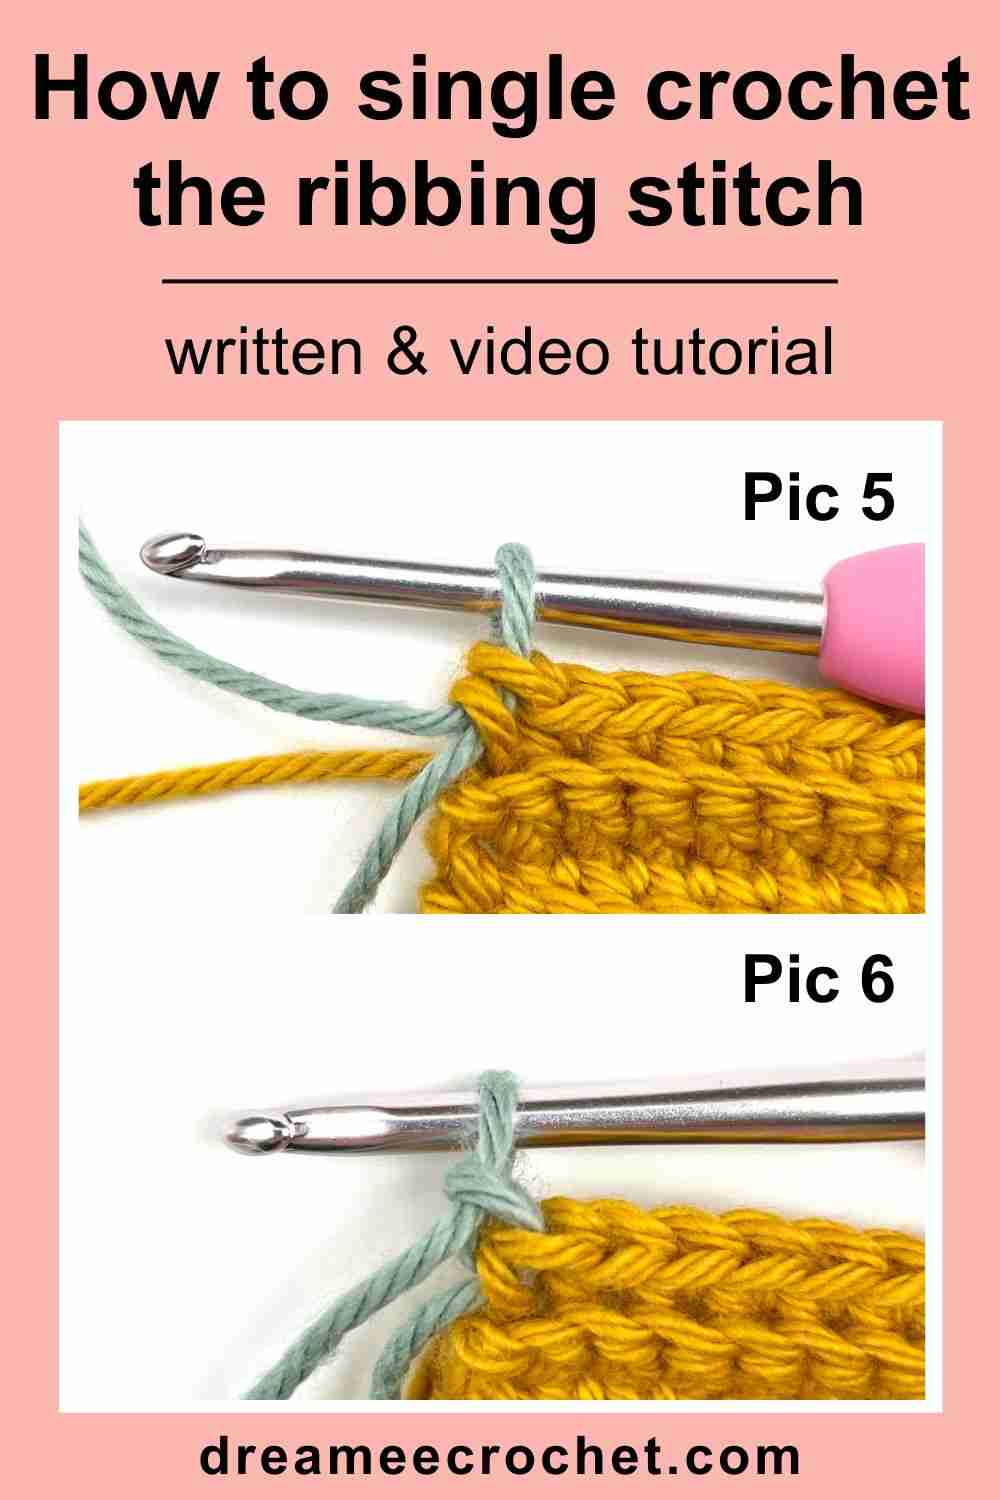
How to Change Colors When Working on the Single Crochet Ribbing Stitch
– when working on the last SC in a row: insert hook into the back loop of the last stitch; yarn over; pull through the stitch, then yarn over with new colour and pull it through the two loops on the hook (Pic 5)
– then CH1 using new colour and TO (Pic 6)
– when working on the first and last SC in the next row, SC into back loop only instead of the whole loop
– continue to crochet as per row R3
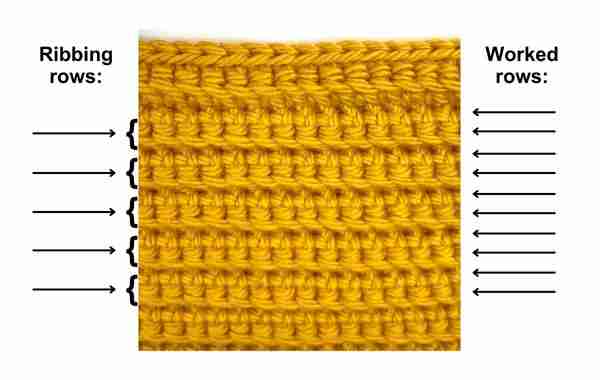
How to Count Rows When Working on the Single Crochet Ribbing Stitch
– you can either count the ribbs or the worked rows – this tutorial is written using worked rows
– worked row = every single row you will crochet
– ribbing row = two worked rows; one row will create the raised ribbing effect and the other row will be sunken in between the ribbing
Different Types of Crochet Ribbing
If you love this stitch then you may be interested in trying different types of crochet ribbing that you can achieve by using the same technique. Just replace the single crochet stitches as described below.
Slip stitch ribbing – use slip stitches instead of single crochet, CH1 at the end of each row
Half double ribbing – use half double crochet stitches instead of single crochet, CH1 at the end of each row
Double crochet ribbing – use double crochet stitches instead of single crochet, start from 3rd chain from the hook in R1, CH2 at the end of each row
Watch the Full Video Tutorial
Watch the step by step video tutorial that will show you how to single crochet the ribbing stitch, how to change colors and even how to count the rows. I have included both right handed and left handed versions.
Please don’t forget to subscribe to my YouTube channel to receive an update every time I publish a new video. 😉
Right Handed

Left Handed

Share Your Feedback with Us
I hope you you found this tutorial useful and will make many crochet items using this handy single crochet ribbing stitch. I welcome your feedback so please leave a comment in the comment box at the bottom of this page.
And as always, I love to see your finished crochet projects so please share a photo of an item you made using this stitch on social media with the hashtag #dreameecrochet.
Join our Dreamee Crochet Facebook group to share your makes, chat to fellow crocheters or to exchange tips and tricks. You can also share feedback and ask for support when working with my patterns.
You Need to Check These Out!
Visit my free crochet patterns and video tutorials for more beautiful patterns and videos you will love!
Free square crochet coaster pattern
Free ribbed cup cozy crochet pattern
Free crochet heart pillow pattern
Happy crocheting!


